Showing posts with label indoor activity. Show all posts

Tuesday, December 13, 2011

Bubble Wrap Letters

I never know whether to start with a picture of the final product, so that you know whether you want to even keep reading...or, if I should save the picture of the final product until the end to build the suspense.  Oh the dilemma.  Well, today, we'll start at the end.

Letter prints made using bubble wrap.  I liked how they turned out so much, we framed and hung them up.

And now, back to the beginning...

I laid a print-out of the letters underneath the bubble wrap and then traced the letters onto the bubble wrap using a marker.  You can see Abby's little hand popping bubbles.  Really...who can resist?


I then cut out the letters and taped them to the waxy side of freezer paper.

Let the painting begin. 


Each kid chose two colors of paint.  I was concerned that if we used too many colors we would end up with brown gloppy letters.


Get your letter nice and covered with paint...


...and then press a piece of paper onto the bubble wrap.  Thankfully, my husband and I named our children good bubble-wrap-letter names.  An "E" and an "A".  Nice symmetrical letters.  For a non-symmetrical letter, like an "R," for example, be careful.  I am writing this at 5:30 AM, so I can't even picture what you should do.  The bubble wrap letter should be drawn and cut in the reverse of the actual letter, right?  Right?  I am so confused and again, so thankful I had the foresight to name my children with symmetrically lettered names.  I hate to say it, but I guess you non-symmetrical people are on your own.


Some finished products:

 For the last set, we just pressed paper onto the bubble wrap letters in a random fashion, using up the paint that was there. 


And here's what happens to your "A" bubble wrapper while you are focused on your "E" bubble wrapper.  Ok, so clearly I knew it was happening since I documented the process with pictures. 


Back to the beginning.  I absolutely adore these!


So, if nothing else, let this be a lesson in choosing names for children.  Symmetry is key.


Friday, October 28, 2011

Pumpkin Head

When we dropped Eli off at school on Wednesday there was a "Pumpkin Head" on the table with which the children could play.  A "Pumpkin Head" is this:

But it's a pumpkin instead of a potato.  Genius, huh?


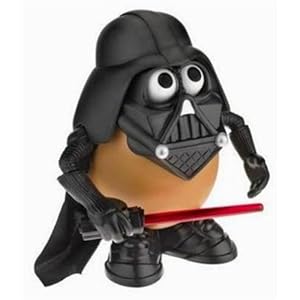
I also found this picture during my "Mr. Potato Head" Google Image search.  It simply must be included here.

Darth Tater.  Genius again.

Ok, back to Pumpkin Head.  Eli's very creative teachers had drilled holes, using a screwdriver, in a pumpkin and had the Mr. Potato Head pieces out for play.  What a fantastic idea!  We had to do it too.

Abby and I picked up some "Funkins" on sale at Joann's.  Eli's teachers had used real pumpkins, but I liked the idea of being able to save ours until next year.  I am not sure I made the right choice...more on that later.  Using our Mr. Potato Head as I guide, I started poking holes.

I did not put a hole on top of the pumpkin, as the hats sat nicely right on top of the stem.  Getting holes into the pumpkin proved to be a harder task then I had originally thought.  I would have been better off to use a real drill.  Also, this produced some dusty stuff, as you can see on the cookie sheet.  I guess a "Funkin" has it's own kind of pumpkin guts.

My Pumpkin Head injury.  I had to push hard to get those holes in. 

I do think the pain was worth it, however, to see all of these happy faces...on Children Heads and Pumpkin Heads alike.

My picture of the final products.  Sorry Green Hat Pumpkin Guy...your other pink ear seems to be missing in action.

And...Abby wanted to take a picture of the final products too.  I think her picture is much more artistic than mine.  She must have her Daddy's photography genes.

My thoughts on using a real pumpkin versus the fake pumpkin:  My first inclination toward the fake pumpkins had been my desire to keep them until next year and I didn't want to get pumpkin guts on our Mr. Potato Head pieces.  BUT, the fake pumpkins have been leaving behind some dust, fake pumpkin guts, if you will.  There is dusty stuff on our Mr. Potato Head pieces and I will have to wash them anyways.  That said, I think I would rather have done this with real pumpkins. 

What great fun!  
Thanks to Eli's wonderful teachers for another fantastic idea in their LONG, LONG line of fantastic ideas.  We are so thankful for amazing teachers in the life of our son.


Tuesday, October 18, 2011

Pumpkin Math (Loosely)

I am a bit behind on blogging.  A COUPLE WEEKS AGO, on the way home from school, Eli said to me, "Can we work on my math today?"  Music to my ears.  Seriously.  Here's what we came up with:

I decided to have the kids investigate the different ways that we can combine numbers to make a total of 6.  I had both of these papers set up at the table, exactly like you see above, and invited the kids to explore.

We started, of course, by eating the candy pumpkin.  The six candy corns were used as the counters for the activity.  I had a bag of candy corn and pumpkins in the pantry that had been purchased to top some cupcakes.  We opened the bag a bit early.

For Eli's paper, he would count out the candy corn needed for the sum.  So, he would put 2 candy corns under the 2 (in the 2 + 4) and then 4 candy corns under the 4.  We could then count the total and find that 2 + 4 was indeed 6.  We worked our way around the paper, marveling at the many ways you could get a total of 6.  It's true;  we marveled.

On Abby's paper, there were boxes drawn in which she would place the candy corns.  With her, this was more of an exercise of practicing one-to-one correspondence:  one candy corn goes in one square.  Many times, she would try to put two candy corns in one square.  As with Eli, we would count the total number of candy corns once they were in the squares to find a total of 6. Again, for Abby, it was great practice of counting with one-to-one correspondence as she does like to count the same candy twice.  2 + 4 is definitely not 7.

Counting and adding away.
Some fun extensions:
  • Investigate what happens when you do 2 + 4 and 4 + 2.  Does the same thing happen for 5 + 1 and 1 + 5?  YAY!!  You just taught your kid the Commutative Property of Addition.
  • How about some Algebra?  I have 2 candy corns...how many more do I need to make 6?  Essentially, you just solved the equation 2 + x = 6 and found that x = 4.
  • And now the fun part...SUBTRACTION.  Once all of the addition has been completed, start eating!  I have 6 candy corns and I just ate one.  How many are left?
  • Here's a tricky one:  I have three candy corns left.  Can I eat 6 of them?  NO WAY.  3 - 6 and 6 - 3 are not the same thing.  You just taught your kid that subtraction is NOT commutative.
I titled this "Pumpkin Math (Loosely)" because that is what it is.  The pumpkin in the center of the paper is meaningless, it could just as easily be an apple or a Thanksgiving turkey or a Christmas tree or completely blank.  You could also investigate ANY number.  I chose 6 simply because it seemed like a good amount of candy to eat...enough to feel like you were eating a decent treat, but not enough to make kids crazy.   All that to say, the pumpkin was festive for fall and we got to eat 6 pieces of candy.  Ok, really, we got to eat 6 + 1 pieces of candy, including the pumpkin.

Doing math while eating candy with my sweet kids...that was a fun day.


Monday, September 19, 2011

Scissoring

We like to cut paper with scissors.

In my kids' lingo, we are "scissoring" with "kid scissors."  In my lingo, we are really working those fine motor skills. 

Eli will cut and cut into smaller and smaller pieces.  Here, he is using some fancy edged scissors.  He thought that was pretty cool.
It is so interesting to see the differences in their developmental stages.  Abby has to have someone hold her paper and she does her "scissoring" with two hands, while Eli holds his own paper and cuts one-handed.

The final products.  What a great way to use up scrap paper!

Eli and I have also used the Kumon "Let's Cut Paper" book to practice cutting skills.  At this link you can "look inside" the book to see some of the cutting activities.

Who knew scissoring could be so incredibly fun?  
Scissor on.  Scissor on.


Wednesday, September 14, 2011

Re-purposing Kids' Art

I don't like to throw anything away that my kids make.  As a crazy sentimental mommy, I would keep forever and ever a little scratching done on a Post-it note, if it was scratched by the hands that belong to these faces:


The faces that belong to those hands are pretty cute, so, needless to say, I have stacks of paintings and colorings and markerings and stickerings.  I know I can't keep it ALL,  but, I can't bring myself to just pitch their creative endeavors.  So, a way to get rid of some of the stacks of stuff, without just moving it to the trash...

I have had these on the wall for a long, long time and it was long past their time to go.  We started by cutting out little rectangles from the paintings with the goal of making notecards.

Rectangular cuttings all ready to go.  I did bring myself to throw away the scraps, though it was a challenge.  Told you I was crazy sentimental...I wanted to keep the SCRAPS of their paintings.

We then glued the painting pieces to blank notecards purchased at the Dollar Store...
Once we did the gluing, I did put the notecards under a bin of magazines to help flatten them out. 

We also cut some longer strips from the original paintings and then folded them in half to make another type of notecard.
So, there is painting on both sides and blank on the inside.

Sending off their art work in the mail truck sure seems better, to me, than sending it off in the garbage truck.

For Reading.

Wednesday, August 31, 2011

Food Group Placemat

Some time ago, I was working my way through a parenting type magazine and found this little thing I decided to keep:

That's how I roll through magazines:  I rip out what I want to check out later and then one of two things happens:
  • Ideally, the ripped out paper is filed in a binder to be referred to later when I am looking for fun ideas.
  • More often than not, the ripped out paper is stacked on the dining room table, along with other ripped out papers, and then moved to the kitchen counter and then back to the table several times, until I do something with it (like file it in the binder) or toss it.
On this particular occasion, I was fast to deal with my little ripped out clippings, and checked out, the DAY AFTER I RIPPED IT OUT (that's a record, people), ChooseMyPlate.gov.  Wow!  I had known that some time ago the classic food pyramid that had plastered the walls of home economics classrooms around the country had been replaced with this "Plate" idea.  The basic idea:  fill half your plate with fruits and vegetables, a quarter of your plate with grains (hopefully whole-grains), and the last quarter of your plate with protein.  Throw in some dairy and you're all set.  Anyways, this site has some really neat features and it was quite fun to poke around.  I went to this site just to look, nutrition is one of my "things" right now, but then I found this page with coloring sheets.

We used "Coloring Sheet Option 1," which is a black and white PDF file of the "Plate" image I tore out of the magazine.  My thought was to make a placemat with the kids, so we could make sure we had all the food groups covered, in the right proportions, at meal time.  And what do you do with pre-readers?  You have pictures to accompany the words.  How I want to just post a document with the pictures I found, but I am just not sure how all the copyright-schmopyright details work.  (Can anyone help me with that??)  But, using Google Images, I found some really nice pictures by just searching each food group name.  And then...we were off...

We backed our plates on 12x12 paper and started coloring.  

Doing craft projects with my kids teaches me a lot about myself and a lot about them:
  1. Moments when I realize how much I like to be in control and have to let go of said control:  Watching Eli smear layer upon layer of weird-waxy-orange-crayon-thing on his placemat and watching Abby color with a glue stick.  
  2. Moments when I get insight into my kids' personalities:  I watched Eli color in his entire "Dairy" cup with great passion.   At the same time I saw Abby watch Eli and then do the exact same thing with her "Dairy" cup.  See in the pictures?  Interesting...
 
Our usual pattern:  Eli finishes in about two minutes and Abby could go for hours.


Finished projects, which we covered in Con-Tact paper.


Finished kids with their finished projects.  Life is rough when your mom makes you make a Food Group Placemat.


Finished projects in use.  It's confusing that cheese is a Dairy AND a Protein. 

And we are now eating in style.  I am sure that Eli wishes for a placemat that is ALL Fruits and Vegetables and Abby longs for an ALL Yogurt placemat.  Well kids, you'll get no sympathy from me because I want an ALL ice-cream placemat.


As a side note, in case anyone is wondering, this is the first art project we have done in a long time.  A LONG time. Just so you know...


Friday, August 19, 2011

Indoor Carnival

We celebrated Eli's birthday four different times.  That's a lot of birthdays for a five year old and a lot of birthdays for a five year old's mom.  Each celebration was wonderfully fun, but it was still four celebrations.  You've heard of this?


 Well, my husband and I felt that it could have been this:

Taken after the second of four parties.

On the fourth day of parties, I had some restless troops who needed some help waiting until said party was going to begin.  I had one game in mind and Eli invented the rest.  It was an Indoor Carnival, indeed. 

Game #1:  Beanbag TossMy One and Only Idea
We cut a cereal box in half, leaving the front/back panels each attached to one side panel.  Did that make sense?  A hole was cut in the middle of each.
These were then taped, by the side panel, to a table.
We brought out the beanbags and started tossing.
Eli elected to toss from a rocking chair.  I guess at another year older he was really feeling the aches and pains of aging.


Game #2:  Dueling Beanbag Toss
Eli wanted to tape a target to each side of the table and have he and his sister toss simultaneously.  You can imagine how this ended, with the sister sobbing on my lap after a beanbag bounced off her cute little face.

Game #3:  Cup Pyramid Knock-Down
The face says it all on this one.

Game #4:  Beanbag TossA Variation
I happened to snap a picture of the only one that made it successfully to its target.
You can see the sister in the chair...still recovering from her beanbag-to-the-face injury.


Game #5:  Bowling
Cups...a basketball...bowling, of course.  Nice form, Buddy!

Game #6:  Hanging Cup Ball Toss
Eli did actually make a shot into the clear cup on the bottom. 


So, there you have it.  One game that turned into six.  Now, I did end up with a crying girl that never quite recovered and messier house than when I started, but, I also got this:
Worth it.