Monday, January 9, 2012

Play Makeup

If you were to ask Abby what her favorite Christmas gift was, she would say "my makeup.". This makeup was from Aunt Jessie and she paid a whopping $1.00 for it. Abby's new treasure was a plastic, yellow, Princess Belle cell phone filled with sparkly lip gloss.  That child has used a lot of lip gloss. Aunt Holly savd the day when she told Abby that SHE only puts on makeup once a day. Genius.

The Princess Belle makeup quickly ran out, but the cry still rang out through our house, "Where my makeup?"  This girl needed some makeup.  I went through my own makeup and collected some that I don't use...a good excuse to clean out old stuff. 


I discovered that if I used a butter knife, I could pop the little interior trays of makeup right out, in this case eye shadow and blush. 


I then filled the trays with nail polish and let them dry.  I did have to open some windows to air out the toxic fumes.


Here's my favorite part of Abby's play makeup:  lipstick.  I dug the lipstick out of a tube I got during one of my favorite times of the year...Clinique Bonus Days.  I then glued a marble onto the tube, using a hot glue gun.  Lastly, I painted the marble with two coats of nail polish.


Add some cheap-o brushes, purchased at Meijer, and we were ready to get beautiful.     


This is one happy girl...who is wearing camouflage to offset the very extreme girliness of playing with makeup.


I LOVE watching her with the lipstick.  It's just too cute and a lovely color on her, I might add.


You dazzle me, darling.


Once Abby finished with her own makeup, she moved on to her babies.


All lined up for makeup.


It would be an extreme understatement to say that the makeup has been a hit.  Abby puts on makeup at least a dozen times a day and her little makeup bag is never far from her line of sight.  In fact, as I type this right now, she is sitting inside her princess tent putting on makeup.  Abby has even been teaching her Daddy about makeup and he is a wonderful sport about it.  If there was ever a man to to have a daughter, it is this one...what a great Daddy he is for our little girl. 

There are two downsides to Abby's play makeup:
  1. At least once or twice a day my husband and I have to scurry around the house trying to find the makeup, while Abby tries to remember where she left it last.  She can even tell if anything is missing. "Where my eye shadow?"
  2. Every time Abby opens her makeup she likes to sniff it, as some of the toxic fumes still linger from the nail polish.  Hmmmmmm.

Even with the scurring and the sniffing, however, play makeup has been a HUGE success at our house...and MY makeup is cleaned out and organized.  A bonus.  Oh Clinique Bonus Days, please come again soon...

Tuesday, December 13, 2011

Bubble Wrap Letters

I never know whether to start with a picture of the final product, so that you know whether you want to even keep reading...or, if I should save the picture of the final product until the end to build the suspense.  Oh the dilemma.  Well, today, we'll start at the end.

Letter prints made using bubble wrap.  I liked how they turned out so much, we framed and hung them up.

And now, back to the beginning...

I laid a print-out of the letters underneath the bubble wrap and then traced the letters onto the bubble wrap using a marker.  You can see Abby's little hand popping bubbles.  Really...who can resist?


I then cut out the letters and taped them to the waxy side of freezer paper.

Let the painting begin. 


Each kid chose two colors of paint.  I was concerned that if we used too many colors we would end up with brown gloppy letters.


Get your letter nice and covered with paint...


...and then press a piece of paper onto the bubble wrap.  Thankfully, my husband and I named our children good bubble-wrap-letter names.  An "E" and an "A".  Nice symmetrical letters.  For a non-symmetrical letter, like an "R," for example, be careful.  I am writing this at 5:30 AM, so I can't even picture what you should do.  The bubble wrap letter should be drawn and cut in the reverse of the actual letter, right?  Right?  I am so confused and again, so thankful I had the foresight to name my children with symmetrically lettered names.  I hate to say it, but I guess you non-symmetrical people are on your own.


Some finished products:

 For the last set, we just pressed paper onto the bubble wrap letters in a random fashion, using up the paint that was there. 


And here's what happens to your "A" bubble wrapper while you are focused on your "E" bubble wrapper.  Ok, so clearly I knew it was happening since I documented the process with pictures. 


Back to the beginning.  I absolutely adore these!


So, if nothing else, let this be a lesson in choosing names for children.  Symmetry is key.


Saturday, December 3, 2011

Not Too Late

We decorated our Christmas tree on November 27.  On the morning of November 28, Eli stood in front of the decorated Christmas Tree in great dismay because there were no presents under said tree.  Upon questioning his rather passionate response to an empty-under-the-Christmas-tree, he said, "I thought it was Christmas."  Before December even hit, I was asked numerous times if it was Christmas Eve, if Christmas was in two days, and if we would be getting presents tomorrow.  Time for an Advent Calendar, of sorts. 

The Kids' Advent Calendar.  I did not actually put this together until December 1, so "2" is our first day.


We did this last year also and it was really easy to put together.  I got little envelopes and stickers at a craft store.  Each envelope is labeled with a number and holds TWO ornament stickers.  (Incidentally, the stickers in each envelope are the same.  Who wants to start their day with a battle over stickers?)  A tree for each kid was cut out of green foam (this year from green sparkly paper).  Each morning, the kids take the appropriate envelope down, remove the stickers, and decorate their tree.    No more tears from a child who, on a random Tuesday in the middle of December, thought it was Christmas morning. 

Here is how it looked last year:

You can see on the second picture how envelopes are gone and trees are getting decorated.  Christmas is coming...but it's not today, dear children.

More from last year...does the scowl make Abby even cuter?  Maybe.

So, it's not fancy, it's not spiritual, but it's a fun, visual countdown.  AND...it's not too late to make one for yourself!  If I am REALLY organized this year, I'll load the envelopes with stickers BEFORE I pack them away.  Then, I'll just have to tape them up, making it more conceivable to start on the REAL December 1.  If I type it here, maybe that will help me to actually do it.  We'll see...


Happy Advent Season


Advent is much, much more than stickers on a Christmas tree...check out this video.

Tuesday, November 29, 2011

A Choice

My home was already 63% demolished when the tiny 5-year old and 3-year old demolishers descended the stairs this morning.  In a fort building effort, we demolished the rest.  So, this morning, amidst rain and headaches and a desire to only see this:


I choose to see this:


A day is filled with so many little moments in which I must make a choice; a choice to see what is good in the middle of what seems to be the worst.  I fail at this more than I succeed, but by God's grace, I hope to see that reverse.  Every time I choose to see good over bad, every time I choose gratitude and thankfulness over ingratitude and bitterness, the scales start to tip the other way.

And now, I have to choose to clean.  But, I get to clean while listening to the happy sounds of my kids playing together and for that, I choose to be thankful.

Thursday, November 17, 2011

Turkey Snack Cups

I saw this really cute idea on Pinterest and had to do it.  Here's our spin on Turkey Snack Cups:

I started by stacking five pieces of multicolored construction paper so that I could cut five feathers at the same time.  Once stacked, I cut out a feather shape, fanned out the feathers, and got this:

A piece of tape on the front and a piece on the back did the trick.

Then it was time for the face.  I used a circle punch to get a brown face and then put on eyes using a black marker.  Googly eyes would have been cute (like in the original picture), but we didn't have any.  I then cut out little yellow triangles for beaks and pieces of red yarn for the red, stringy, turkey thingy.  What is that called?  I don't know, but I am pretty sure it's not called a turkey goiter, which is the only name I can come up with.  Here's how I put the face together:

After some deliberation, I decided to use one bigger piece of tape, putting the beak and turkey goiter on it first.  The whole big piece of tape then went onto the face, with the excess tape being wrapped to the back of the face.

Putting it all together:
One piece of tape secured the feathers to the back of the cup and then another piece for the face on the front.  I did not use any glue, only tape, for this project.

Done. We filled our cups with raisins, but anything brownish would do.  We have, however, "stuffed" our turkey cups with goldfish, animal crackers, cucumbers, water, and orange juice and they still look pretty cute.  I did realize, after the fact, that these could be made with brown cups, which I do think would work nicely.


In an ideal setting, I would have drawn feathers on the construction paper and my children would have cut them out, using those fine motor skills.  We would have discussed shapes, while we happily worked away together...circles for the face, triangles for the beaks.  We could have made patterns with the feathers or read books about turkeys.  We did not do any of this.  Since I was making these for Eli's class, I was in mass-production-turkey-cup-mode.  There was no time for learning, teamwork, or collaboration, and, 18 turkey cups later, I knew it was the right way to go.  Sometimes, kids crafts are a little easier to do when there are no kids involved.  The kids did get to use them, however, so I don't think they felt cheated in any way.


Cheers


Thursday, November 10, 2011

Who's Your Mama?

In a recent Parenting magazine, I read an idea of a game to play to help children learn to consider the places from which food comes.  Ideally, though far, far, far from perfectly, we try to eat food that comes from a real, natural source:  the ground, a plant, a vine, a tree, an animal.  My kids love bacon and the first time they realized that it comes from a pig, it took some time to sink in.  

Sorry, Olivia.

Back to the game.  Select a food and ask your kids who the "mama" of that food is.   It might look like this:

Me:  Milk...Who's your mama?
Kids:  COW
Me:  Good or not good?
Kids:  GOOD!  (generally accompanied by a THUMBS-UP)
Me:  Now, let's talk about if this cow is grass fed or if it's pumped full of hormones.  (Just kidding, I don't really say that...we'll save that for another day, little Eli and Abby.  Cow is good enough for now.  And standard cow is pretty much what mommy and daddy can afford, anyways.)
 
Here it is, for your viewing pleasure, Who's Your Mama:

 (You get it twice because I had to actually embed the video code into the blog to avoid having creepy thumbnails of other videos appear when this one is done.  Now I can't figure out how to get the second video out.  I have decided to just leave it to spare you having to see a really weird thumbnail of Heath Ledger's Joker holding weaponry.) 

((I also can't figure out how to get it centered when embedding the code.  Math people are bothered by stuff like that.  The left-justification of the video is really irking me.))


Our goal is playing this game?  Finding food that has a NATURAL mama instead of a FACTORY mama.  Again, we are not perfect (Who could possibly live without Oreos?), but we are trying to make strides away from the factory. 

All this to say, Who's Your Mama is a favorite around here and, by request of the kids, we play it a lot.  Plus, it's just the cutest thing to hear your two-year old say, "Who's Your Mama?"


Friday, October 28, 2011

Pumpkin Head

When we dropped Eli off at school on Wednesday there was a "Pumpkin Head" on the table with which the children could play.  A "Pumpkin Head" is this:

But it's a pumpkin instead of a potato.  Genius, huh?


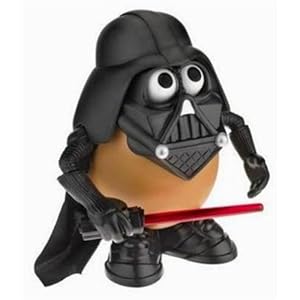
I also found this picture during my "Mr. Potato Head" Google Image search.  It simply must be included here.

Darth Tater.  Genius again.

Ok, back to Pumpkin Head.  Eli's very creative teachers had drilled holes, using a screwdriver, in a pumpkin and had the Mr. Potato Head pieces out for play.  What a fantastic idea!  We had to do it too.

Abby and I picked up some "Funkins" on sale at Joann's.  Eli's teachers had used real pumpkins, but I liked the idea of being able to save ours until next year.  I am not sure I made the right choice...more on that later.  Using our Mr. Potato Head as I guide, I started poking holes.

I did not put a hole on top of the pumpkin, as the hats sat nicely right on top of the stem.  Getting holes into the pumpkin proved to be a harder task then I had originally thought.  I would have been better off to use a real drill.  Also, this produced some dusty stuff, as you can see on the cookie sheet.  I guess a "Funkin" has it's own kind of pumpkin guts.

My Pumpkin Head injury.  I had to push hard to get those holes in. 

I do think the pain was worth it, however, to see all of these happy faces...on Children Heads and Pumpkin Heads alike.

My picture of the final products.  Sorry Green Hat Pumpkin Guy...your other pink ear seems to be missing in action.

And...Abby wanted to take a picture of the final products too.  I think her picture is much more artistic than mine.  She must have her Daddy's photography genes.

My thoughts on using a real pumpkin versus the fake pumpkin:  My first inclination toward the fake pumpkins had been my desire to keep them until next year and I didn't want to get pumpkin guts on our Mr. Potato Head pieces.  BUT, the fake pumpkins have been leaving behind some dust, fake pumpkin guts, if you will.  There is dusty stuff on our Mr. Potato Head pieces and I will have to wash them anyways.  That said, I think I would rather have done this with real pumpkins. 

What great fun!  
Thanks to Eli's wonderful teachers for another fantastic idea in their LONG, LONG line of fantastic ideas.  We are so thankful for amazing teachers in the life of our son.